PAPER PIECING FINE POINTS
These are my suggestions for faster, easier, and better paper piecing.

How far is too far off the line?
To avoid undesirable "block growth," seams should rest immediately next to the paper. The bottom example would force me to re-sew the bumpy area, running a new line of stitches next to the paper where it belongs. I may or may not remove the first stitching.

PRESSING: Avoiding thread show between section seams
After pinning and sewing seam:
(1) Check both sides of seam. If you have caught any paper edges in your seam, free them.
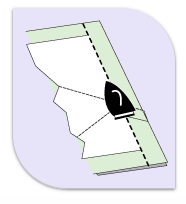
(2) Press the closed seam (see illustration). It really does seem to "shrink" or embed the stitches more firmly into the fabric. (Unfortunately, I don't remember who taught this.)
(3) Open the sections and press from the front, gently. You do not need to spread the seam with any force. Allow the seam allowance underneath to go to the side it wishes. If it does not go to either side easily, gently press the seam open on the wrong side.
Most of the time, you should NOT press seams open. Press them in the direction that they naturally want to fall. I press seams open only when the seam does not want to stay to either side or when directions tell me to; the open seam helps to distribute seam allowances to keep things flatter.
Why is my block not flat?
You will have more problems keeping things flat if: (1) you don't pin the sections together carefully so that the seam allowances are distributed where they should be, and (2) you sew too fast. Sewing at 110 mph makes it hard to keep the stitching as near to the paper edges as possible. In addition, be sure to:
(1) Use a dry iron when pressing. There are lots of triangles and polygons, and therefore a lot of stretchy bias edges, so don't push, pull, or handle seam lines or the edges of the fabric any more than necessary.
(2) Sew the sections together carefully and tightly along the paper edges.
(3) Check that your joined sections lie flat after each seam is sewn.

SEAM RIPPING 101
First lesson: We all gotta rip sometime.
Second lesson: When I was a quilt newbie, I ripped seams like I had been taught, many moons ago...
1 Break every fourth or fifth stitch.
2 Separate the two pieces of fabric starting in the middle somewhere and work the stitches apart to either end.
Still do it this way, too?
Third lesson: Scissors make the job much faster and more pleasant.
For right handers (adjust if you're a lefty):
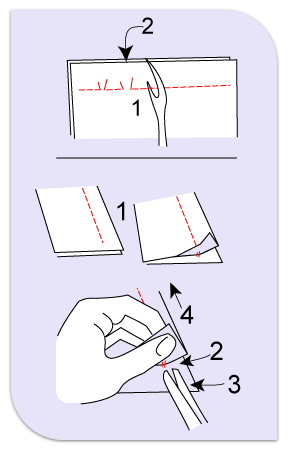
1 Lay fabric flat on table as shown, and peel up the corner of the top layer of fabric.
2 With the tips of some standard shears, clip the first threads in between the two layers. (Do NOT use your pointiest, sharpest scissors, or you will cut your fabric at some point.)
3 Hold the tips of the shears flat to the table, holding down the bottom layer of fabric.
4 Holding the top layer with thumb and forefinger, rip back gently as far as it will go (a few stitches). Repeat steps 2-4.
Master this and you probably won't mind ripping as much (it IS possible to tolerate ripping...!) Save your seam ripper for mid-seam ripping jobs.

